If we have not used Claude Code before, the three tool articles in this series (papers-md-generator, replication-package-analytics, attribution-audit-network) read past a setup step we haven’t taken. This piece fills the gap. The audience is applied economists who write Stata or R, who have used Claude or ChatGPT through a web interface, but who have not run Claude as a CLI tool in their terminal. The goal: get from “I want to try this” to a successful first invocation in about 90 seconds of reading plus whatever the installer takes.
Claude Code is not the web chat
Claude.ai is a web interface; we type, Claude responds, and the conversation lives in the browser. Claude Code is Anthropic’s agentic coding tool. In a local terminal session, it can inspect and edit files and run tools subject to the permissions and environment we provide. With the required parser installed and file access approved, a session can open a paper PDF, write a structured summary, and prepare a git commit without moving each excerpt through a browser.
The local TETS skills described in this tool series are designed for Claude Code. Claude Code discovers personal skills under ~/.claude/skills/; it loads a skill’s instructions when the skill is used, not every skill body at startup. A user-invocable skill can be called directly as /<skill-name>, and Claude may also select a skill whose description matches the request. These behaviors were checked against Anthropic’s official skills documentation on July 21, 2026.
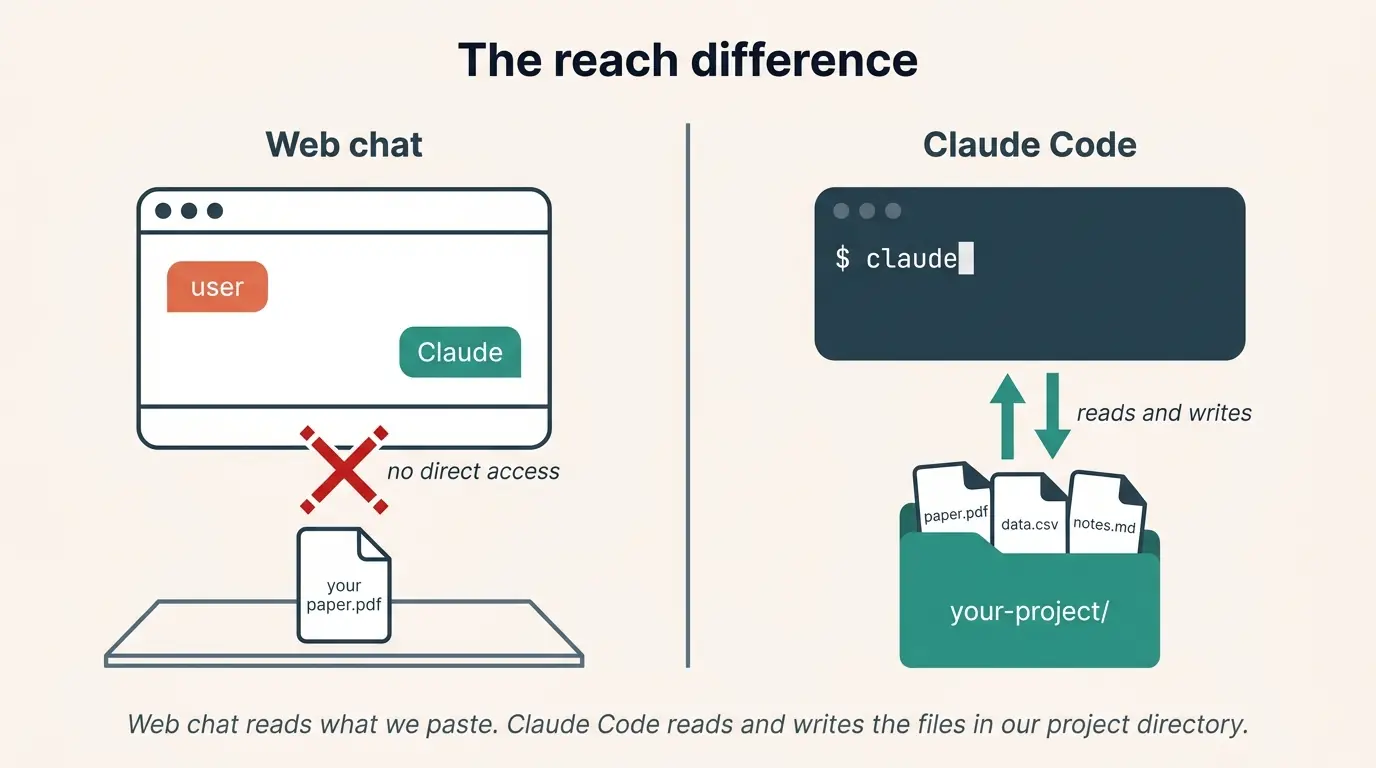
Web chat reads what we paste. Claude Code reads and writes the files in our project directory.
What a skill is, in one paragraph
A skill is a folder with a SKILL.md entry point. The file contains instructions and can include frontmatter that controls discovery and invocation; the folder can also hold scripts, schemas, and reference files. Personal skills live under ~/.claude/skills/ and apply across local projects. Project skills live under .claude/skills/ and apply within that project. By default, the directory name supplies the direct /<skill-name> command, while the description helps Claude decide when the skill is relevant. The skill body enters the conversation context only when the skill is used.
For the TETS skills, the folder structure is roughly:
.claude/skills/papers-md-generator/
├── SKILL.md
├── src/
│   ├── extractor.py
│   ├── grobid_client.py
│   ├── normalizer.py
│   └── ...
├── tests/
└── fixtures/
The SKILL.md is the contract. The Python files are the helpers Claude calls when we invoke the skill.
Installing Claude Code
Anthropic maintains the canonical install instructions, and installation methods change as versions release. As checked on July 21, 2026, Anthropic recommends its native installer on macOS, Linux, and Windows Subsystem for Linux:
curl -fsSL https://claude.ai/install.sh | bash
claude --version
claude doctor
The native installation updates in the background. Homebrew, WinGet, Linux package managers, and a global npm package are also documented options, with different update behavior and prerequisites. The npm route is no longer the recommended default and, as of the check date, requires Node.js 22 or later for installation. Windows PowerShell and Command Prompt use different commands from the one above.
On first run, Claude Code opens the documented login flow. Anthropic currently lists Pro, Max, Team, Enterprise, and Console accounts, along with supported third-party API providers; the free Claude.ai plan is not listed as Claude Code access. If ANTHROPIC_API_KEY is already set, Claude Code asks for approval of that key. Account eligibility, pricing, installer commands, and authentication can change, so follow Anthropic’s official setup page rather than treating this dated snapshot as permanent.
Getting the TETS skills
The skills are public at github.com/dphdame/tets-claude-skills under an MIT license. v0.1.0 was the repository’s only published git tag when checked on July 21, 2026; confirm the repository’s releases and README before installing a later version.
git clone https://github.com/dphdame/tets-claude-skills.git
cd tets-claude-skills
mkdir -p ~/.claude/skills
cp -r papers-md-generator replication-package-analytics attribution-audit-network shared ~/.claude/skills/
python3 -m venv ~/.claude/tets-skills-venv
source ~/.claude/tets-skills-venv/bin/activate
python -m pip install --upgrade pip
python -m pip install -r ~/.claude/skills/papers-md-generator/requirements.txt \
                      -r ~/.claude/skills/replication-package-analytics/requirements.txt \
                      -r ~/.claude/skills/attribution-audit-network/requirements.txt
The repository documents that one virtual environment can serve all three skills. Keep the environment active for the first invocation. In a later terminal session, run source ~/.claude/tets-skills-venv/bin/activate before starting Claude Code and invoking a skill that uses its Python helpers.
The shared/ directory holds the misattribution catalog and method taxonomy YAMLs that two of the skills read; it must sit next to the skill folders. If ~/.claude/skills/ already existed when the current Claude Code session began, documented live change detection should make the new SKILL.md files available without a restart. If the top-level skills directory did not exist at session start, restart Claude Code so it can watch the new directory. Once discovered, the directory names provide /papers-md-generator, /replication-package-analytics, and /attribution-audit-network. Invoking a command loads its instructions; it does not guarantee identical execution or bypass normal permission checks.
There is one important public-release limit. The repository’s attribution-audit-network/network_expander.py imports citation_network_expansion.py from a separate local research directory, but public v0.1.0 does not include that helper or an installation step for it. A clean installation therefore cannot run the attribution-network workflow end to end. The command can be discovered after copying the folder, but the public package is not yet a reproducible implementation of that skill.
The lowest-infrastructure choice is replication-package-analytics on Path A: it needs no Docker or GROBID. It does require a user-supplied tab-separated seed file containing at least one openICPSR project ID. The public repository does not include the documented data/seeds/smoke-10.txt.
What the first invocation looks like
Open a terminal. Navigate to a project directory where we want the skill to write its output:
cd ~/projects/replication-survey
Start Claude Code:
claude
Wait for the session prompt. Type the skill invocation:
/replication-package-analytics mode=smoke seed_file=/absolute/path/to/smoke-10.txt
Create the seed file first. Each non-comment line can contain only a project ID, or a tab-separated project ID, source repository, journal, year, and DOI. With that file supplied, Path A queries Wayback metadata and writes one JSON record per processed seed. Without it, the public v0.1 runner exits with “no seeds found.”
The resulting JSON records are local run artifacts. The repository does not currently ship a verified smoke output or a public panel-of-metrics CSV. The tool article documents the planned evidence release.
A note on GROBID and Docker for papers-md-generator
papers-md-generator extracts methods-section structure from PDFs. PDF parsing is delegated to GROBID, which runs as a local service. The conventional way to run GROBID is Docker:
docker pull lfoppiano/grobid:0.8.0
docker run -t --rm -p 8070:8070 lfoppiano/grobid:0.8.0
If we have not used Docker before, this is a real setup step. Docker Desktop is a free download for macOS, Linux, and Windows. The first run pulls the GROBID image, which is several hundred megabytes. Once GROBID is running, papers-md-generator queries it on localhost:8070 and the rest of the skill pipeline runs.
For applied economists who write only Stata and have never installed a containerization runtime, this is the largest friction point in the series. If Docker is a non-starter, replication-package-analytics Path A remains lighter, provided a seed file is supplied. Attribution-audit-network does not require Docker, but public v0.1.0 cannot run from the repository alone because the imported citation-network helper is missing.
What to read next
The three tool articles assume the setup above is in hand:
- A reference library for empirical methods walks the papers-md-generator skill end to end, including the misattribution-trap engine and the worked Callaway-Sant’Anna example.
- A common shape for econ replication packages walks the replication-package-analytics skill, including Path A vs Path B and the twelve compliance metrics.
- A field map for causal-inference methods walks the attribution-audit-network skill, including the misattribution catalog and the worked FLCI / Armstrong-Kolesár / Rambachan-Roth example.
Each article opens with the felt problem the skill addresses, then walks the mechanism, the validation status, and one worked example. This setup supports the runnable public paths described above. The attribution-network article remains a transparent design and validation record until its missing helper is released.
Have input? Get in touch.